This page is dedicated to the description of TRANSP RO tasks, mostly connected to code installation and maintenance. It is in a way a log different (essential) procedures, which often consist of numerous steps, different environment and commands, and are not performed very often. Frequently this results in users forgetting the workflow details, and consequently in losing time with needing to figure it out again. Therefore these instructions should be a useful tool for both newcomers to the position as well as experienced, but sometimes forgetful ROs. Please note that the specifics of the procedures might change, e.g. file names that contain dates, directory and files owners..., but the main idea should stay the same.
The TRANSP and OMFIT ROs should be part of the transp, transpdev and omfit_admins linux groups in order to have permission to perform tasks essential for maintenance and support. As RO make sure you are added to these groups by raising a Marval ticket, usually sponsored by Žiga Štancar - this is a prerequisite for the successful completion of many of the tasks below.
The website is based on html scripts owned by the transpdev group, located in:
/common/EFDA-TRANSP/Webpages
with the names of individual scripts corresponding to the titles of the webpage sections (descriptive). The scripts can be modified simply by opening them with an editor, e.g. nedit or emacs, and saving the changes. These will then be reflected in the online version (you might need to refresh the website). There is a Git project on GitLab dedicated to the webpage, which mostly serves as backup. Please contact one of the former ROs to be given access to the repository.
Since TRANSP runs are being prepared, submitted, fetched and sometimes analysed through OMFIT, it is the responsibility of the RO to maintain the OMFIT installation on Heimdall for JET related use. Please note that although the installation on Freia used for MAST-U analyses is separate from the Heimdall instance, the maintenance procedure is in principle the same. In order to successfully run OMFIT on Heimdall we need to maintain two packages - namely ATOM, through which we set up the python environment in which OMFIT is run, as well as OMFIT itself, which is linked to a GitHub repository. You will be given access to the OMFIT GitHub repository by filling out the code's license agreement - if that is not the case, or you wish to consult OMFIT's core developer team on another OMFIT issue, please contact Will DeShazer, Sterling Smith or Orso Meneghini . The Heimdall installation is installed in /common/transp_shared/omfit/atom-heimdall-{RO_username} and should be done fresh with the arrival of a new RO, due to installation permissions.
A fresh installation of ATOM and OMFIT is performed following the steps listed below. If there is already a valid installation of both on Heimdall, one just needs to follow the maintenance steps 3. to 6.:
1.) Create a personal folder for the installation (recommended /work/{RO_username}/omfit-branchname which can also be used for code modification) and pull the latest version of
OMFIT unstable in it. This is done by cd-ing into the created folder and cloning the OMFIT git repository, for which you will need GitHub authetication details:
cd /work/{RO_username}/omfit-branchname
git clone -b unstable git@github.com:gafusion/OMFIT-source.git
2.) Start your personal version of OMFIT in a terminal with:
cd /work/{RO_username}/omfit-branchname/OMFIT-source
module purge
module load omfit
python omfit/omfit.py
3.) In OMFIT import the GDT (Global Deployment Tool) module.
4.) In OMFIT GDT update the 'owner' settings to match your username under:
OMFIT['GDT']['SETTINGS']['INSTALLATION']['ATOM']['heimdall']['origin/master']['owner']
OMFIT['GDT']['SETTINGS']['INSTALLATION']['OMFIT']['heimdall']['origin/unstable']['owner']
And the installation folder details matching:
OMFIT['GDT']['SETTINGS']['INSTALLATION']['ATOM']['heimdall']['origin/master']['installDir'] = /common/transp_shared/omfit/atom-heimdall-{RO_username}
OMFIT['GDT']['SETTINGS']['INSTALLATION']['OMFIT']['heimdall']['origin/unstable']['installDir'] = /common/transp_shared/omfit/atom-heimdall-{RO_username}/OMFIT-source
5.) Run the GDT GUI and click:
a.) `Check GitHub for updates` under the `ATOM` --> `overview` tab.
b.)* `CLONE` button under the `ATOM` --> `heimdall` tab. This will clone the ATOM repository where you told it to (*Please note that this only needs to be done when
performing a fresh installation, and is not needed for a simple update.)
c.) `PULL` button under the `ATOM` --> `hedimall` tab. This will install `miniconda`, the `OMFIT-source_master` and
`OMFIT-source_unstable` folders. This operation usually takes more time, varying from half an hour up to several hours.
d.) Repeat steps a. to c. for the OMFIT installation using the GDT GUI tab adjacent to ATOM's.
6.) Check that the installation completed successfully - the OMFIT version can be checked in the GDT GUI, as well as in
OMFIT's initial pop-up window, when opening the public version. The target ATOM directory structure of /common/transp_shared/omfit/atom-hedimall is listed below, which should be connected
to the transpdev group with write group permission:
drwxr-xr-x 2 zstancar people 4 Sep 17 15:17 bin
drwxr-xr-x 2 zstancar people 6 Sep 17 15:17 cron_jobs
drwxr-xr-x 7 zstancar people 28 Sep 17 15:17 docs
drwxr-xr-x 8 zstancar people 15 Sep 17 16:03 .git
-rw-r--r-- 1 zstancar people 385 Sep 17 15:17 .gitignore
drwxr-xr-x 3 zstancar people 7 Sep 17 15:17 html
-rw-r--r-- 1 zstancar people 7993 Sep 17 15:17 Makefile
lrwxrwxrwx 1 zstancar people 19 Sep 17 16:21 miniconda3 -> miniconda3_unstable
drwxr-xr-x 33 zstancar people 38 Sep 17 16:20 miniconda3_3.2021.33.1
lrwxrwxrwx 1 zstancar people 22 Sep 17 16:20 miniconda3_master -> miniconda3_3.2021.33.1
lrwxrwxrwx 1 zstancar people 22 Sep 17 16:21 miniconda3_unstable -> miniconda3_3.2021.33.1
drwxr-xr-x 9 zstancar people 11 Sep 17 15:17 modules
lrwxrwxrwx 1 zstancar people 21 Sep 17 16:21 OMFIT-source -> OMFIT-source_unstable
drwxr-xr-x 14 zstancar people 23 Sep 17 16:20 OMFIT-source_3.2021.37
lrwxrwxrwx 1 zstancar people 22 Sep 17 16:20 OMFIT-source_master -> OMFIT-source_3.2021.37
drwxr-xr-x 13 zstancar people 23 Sep 17 17:10 OMFIT-source_unstable
drwxr-xr-x 5 zstancar people 5 Sep 17 15:17 packaging
drwxr-xr-x 7 zstancar people 7 Sep 17 15:17 platform
-rw-r--r-- 1 zstancar people 755 Sep 17 15:17 README.md
7.) Upload any changes made to the OMFIT GDT module by commiting the changes to GitHub - detailed instructions on how to push local changes to the repository can be found below.
8.) **Temporary - Nov. 2021** A separation of JET and MAST institution files located in /common/transp_shared/omfit/atom-heimdall-{RO_username}/OMFIT-source_unstable/institutions/,
implemented because of the complete (but gradual) split of Heimdall and Freia, has introduced a bug in how the settings for the two specific machines are uploaded into every individual session.
The current status is that the MAST settings get picked up for JET as well, which corrupts the OMFIT startup JET settings. Until Heimdall and Freia are completely split, when accessing the other machine's
settings will not be possible, we need to be deleting the MAST institution file from the installation folder after every OMFIT pull we make, namely:
rm /common/transp_shared/omfit/atom-heimdall-{RO_username}/OMFIT-source_unstable/institutions/institution.CCFE_MAST
After the server split is complete all the settings are in place to render this manual deletion unnecessary.
9.) **Temporary - Jan. 2022** Due to issues when installing the ATOM environment through the GDT module - conneted to the conda-forge
mkl package - one needs to manually update the conda-forge
mkl package, by running the following sequence of commands in the terminal:
module purge
module load omfit
conda install mkl mkl-service
and check that the evironment is properly solved and package installed.
Note that both the ATOM and OMFIT installations can be kept up-to-date automatically, which is enabled through the GDT GUI by selecting the `Loop every X seconds to keep my installations up-to-date`. For this to work one needs to be running OMFIT in the background continuously, which means the VPN session on Heimdall needs to be sustained for an indefinite amount of time. In practice this is hard to achieve - NoMachine enables the longest lasting sessions but even these are forced to restart weekly. In the current workflow we are launching the updates manually when needed. Experience shows that updating both installations once per week is sufficent in most situations - note that the ATOM environment repository is updated at a much lower frequency than OMFIT. Updating the ATOM installation is usually time consuming, taking up to an hour, while updating OMFIT usually takes around 5 minutes.
There is an overarching OMFIT module file that we use to set up the software environment with:
module load omfit
The file is stored in: /usr/local/modules/default/omfit/unstable/. The names of modules contained in the folder are denoted with dates, i.e. 2021.09.20, with the most
recent one being called by default. Important features of the file are that at JET we need to be loading the jet module due to the fact that we are using the ppf python
library in data preparation, and we need to define the PYTHONPATH and ANACONDA variables. Hint: if there are issues with modules clashing when running OMFIT and its sub-processes
this might be a good place to check for inconsistencies. The structure of folder /usr/local/modules/default/omfit/ and its dependent
/common/transp_shared/omfit/modules/omfit needs to be maintained as is, because OMFIT/TRANSP functionality is bound to it. Specifically when updating the ATOM and OMFIT
installations on heimdall we need the /unstable subfolder, which must contain the latest module script. If folder strucutre needs to be changed in any way please
contact the current MAST OMFIT/TRANSP ROs as well to converge on a solution, since the folder is shared with the Freuia cluster.
When installing/updating ATOM there is an option to keep all master release versions and all miniconda3 environments, should a complete log and backward compatibility be required.
The current settings for Heimdall do not include the option, since experience showed that this was not needed. However this feature can be turned on by adding:
#keep_all_conda_versions
to the `post_pull' command in the GDT module in:
OMFIT['GDT']['SETTINGS']['INSTALLATION']['ATOM']['heimdall']['origin/master']
One of the main and most creative tasks of the TRANSP RO is to maintain and develop the OMFIT/TRANSP module for JET users. These tasks vary from keeping up with changes in the underlying JET data system like PPF, to developing new integrated modelling tools. Below is a set of steps describing how to make changes to OMFIT, perform regression tests on the established workflow and push the changes to the GitHub repository.
1.) Create a personal folder for a local branch of OMFIT and pull the latest version of unstable in it. Switch to the a local branch with an arbitrary name:
mkdir /work/username/omfit-branchname/
cd /work/username/omfit-branchname/
git clone https://github.com/gafusion/OMFIT-source.git
git status
git checkout unstable
git pull
git checkout -b branchname
2.) Make changes to OMFIT, run regression tests to check that the functionality of TRANSP scripts for JET is preserved, i.e. sequentially going through the steps to prepare a
generic JET TRANSP run, and export changes to the local OMFIT branch:
a.) Load OMFIT unstable, import selected module, and make desired changes;
b.) Load the main TRANSP regression test through 'File' --> 'Load regression script' --> 'test_TRANSPrun.py';
Run the script in OMFIT's command box with: OMFIT['test_TRANSPrun'].run(device='JET') and make sure that no errors were detected;
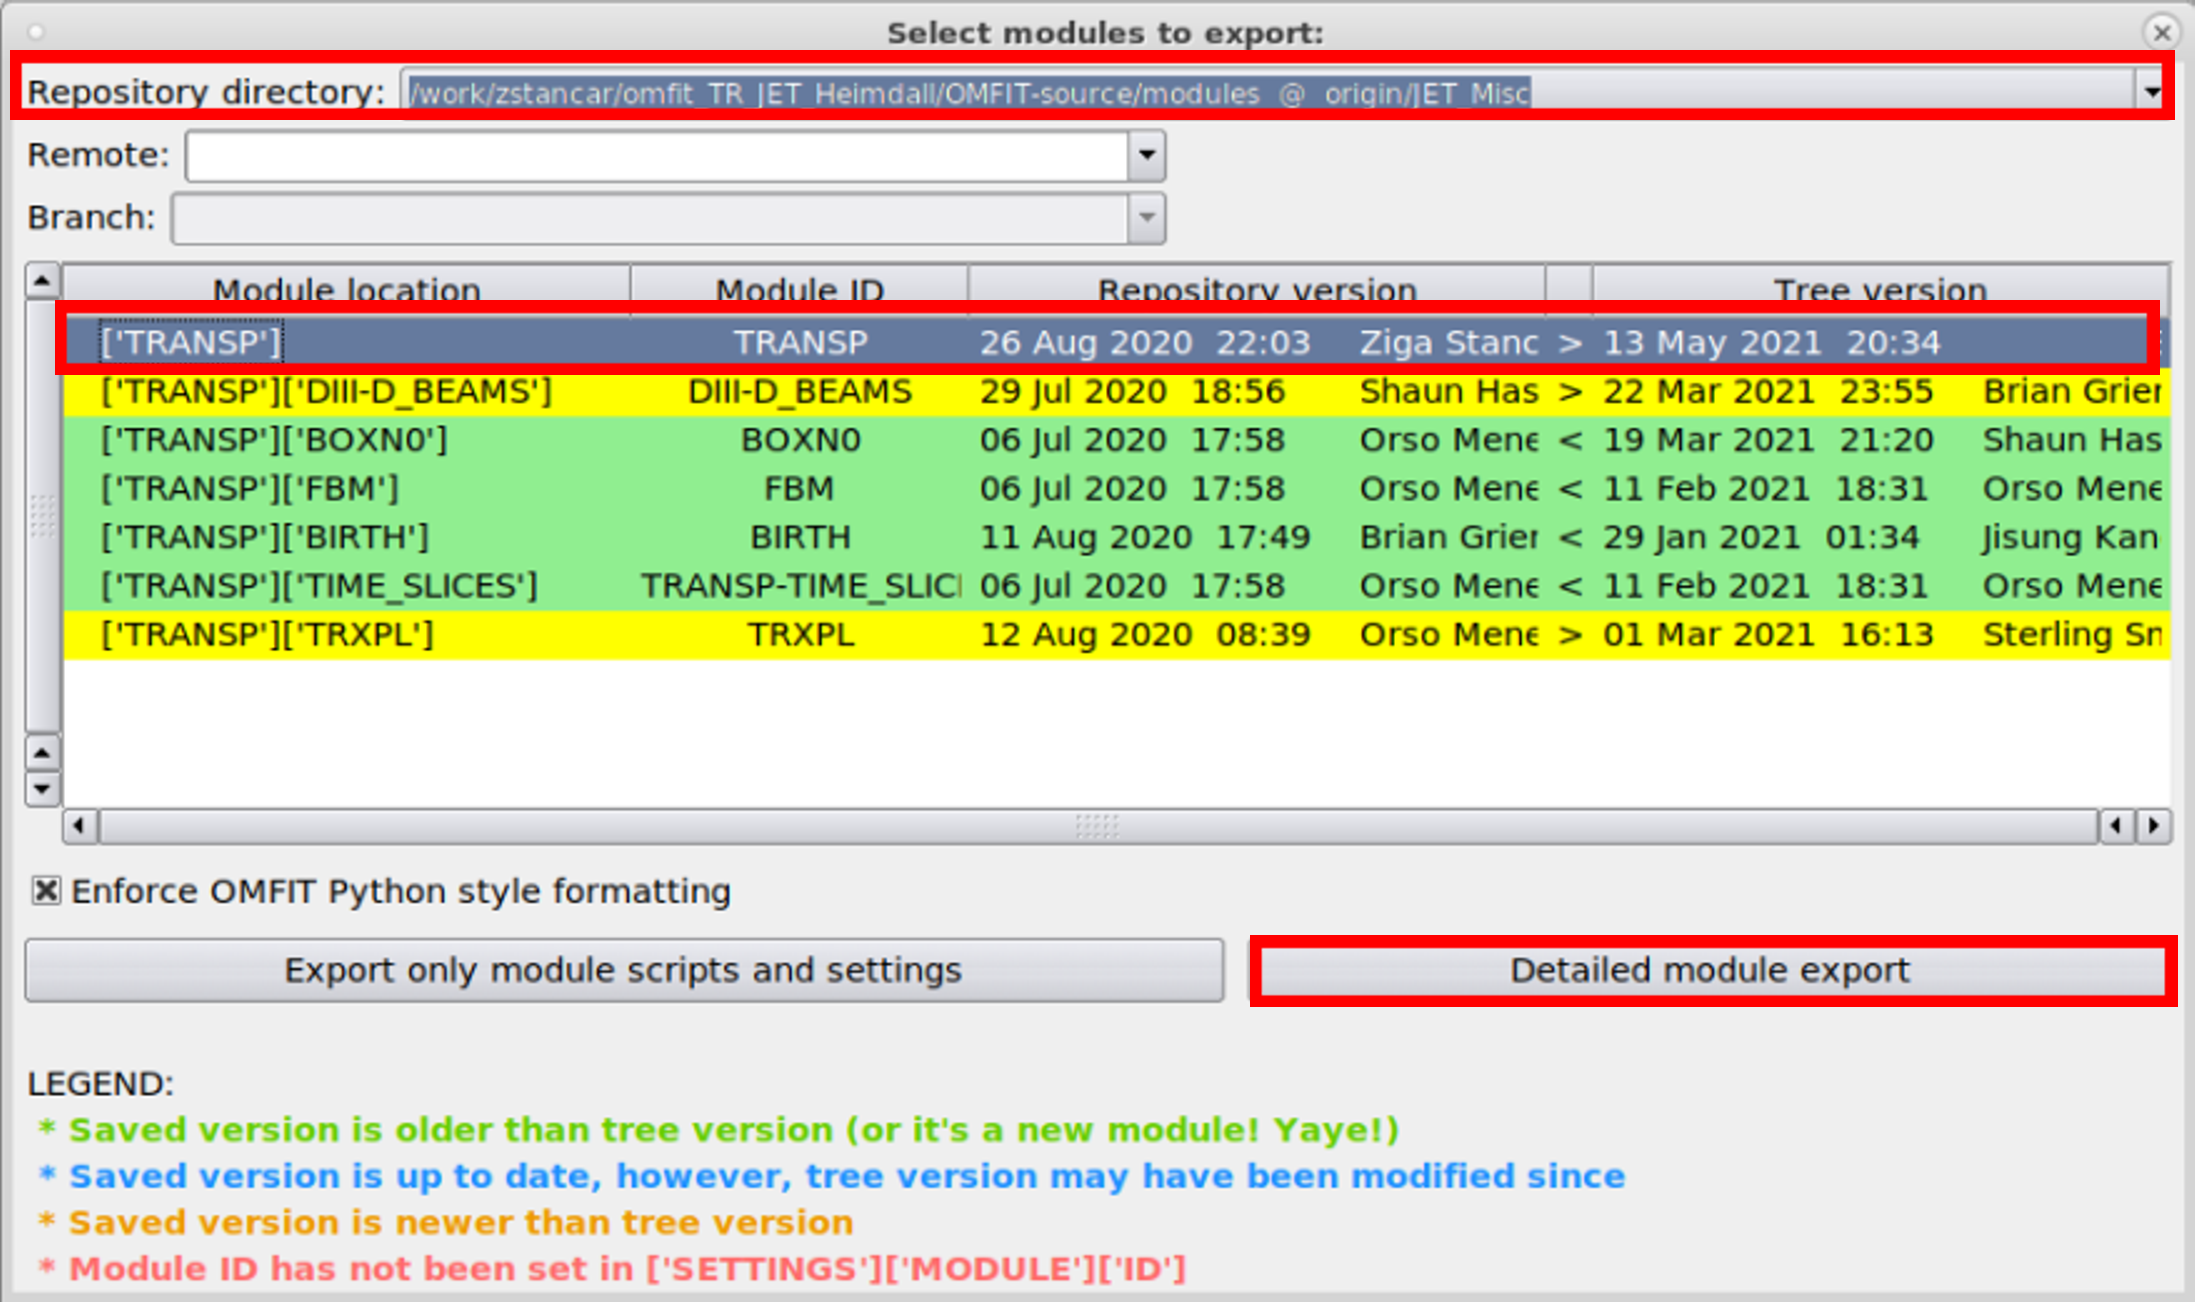
c.) Export the changes you made through 'File' --> 'Export modules';
In the Export pop-up window change the 'Repository directory' to your local branch, select the '[TRANSP]' module location and click the 'Detailed module export'
button, as shown in the figure below;
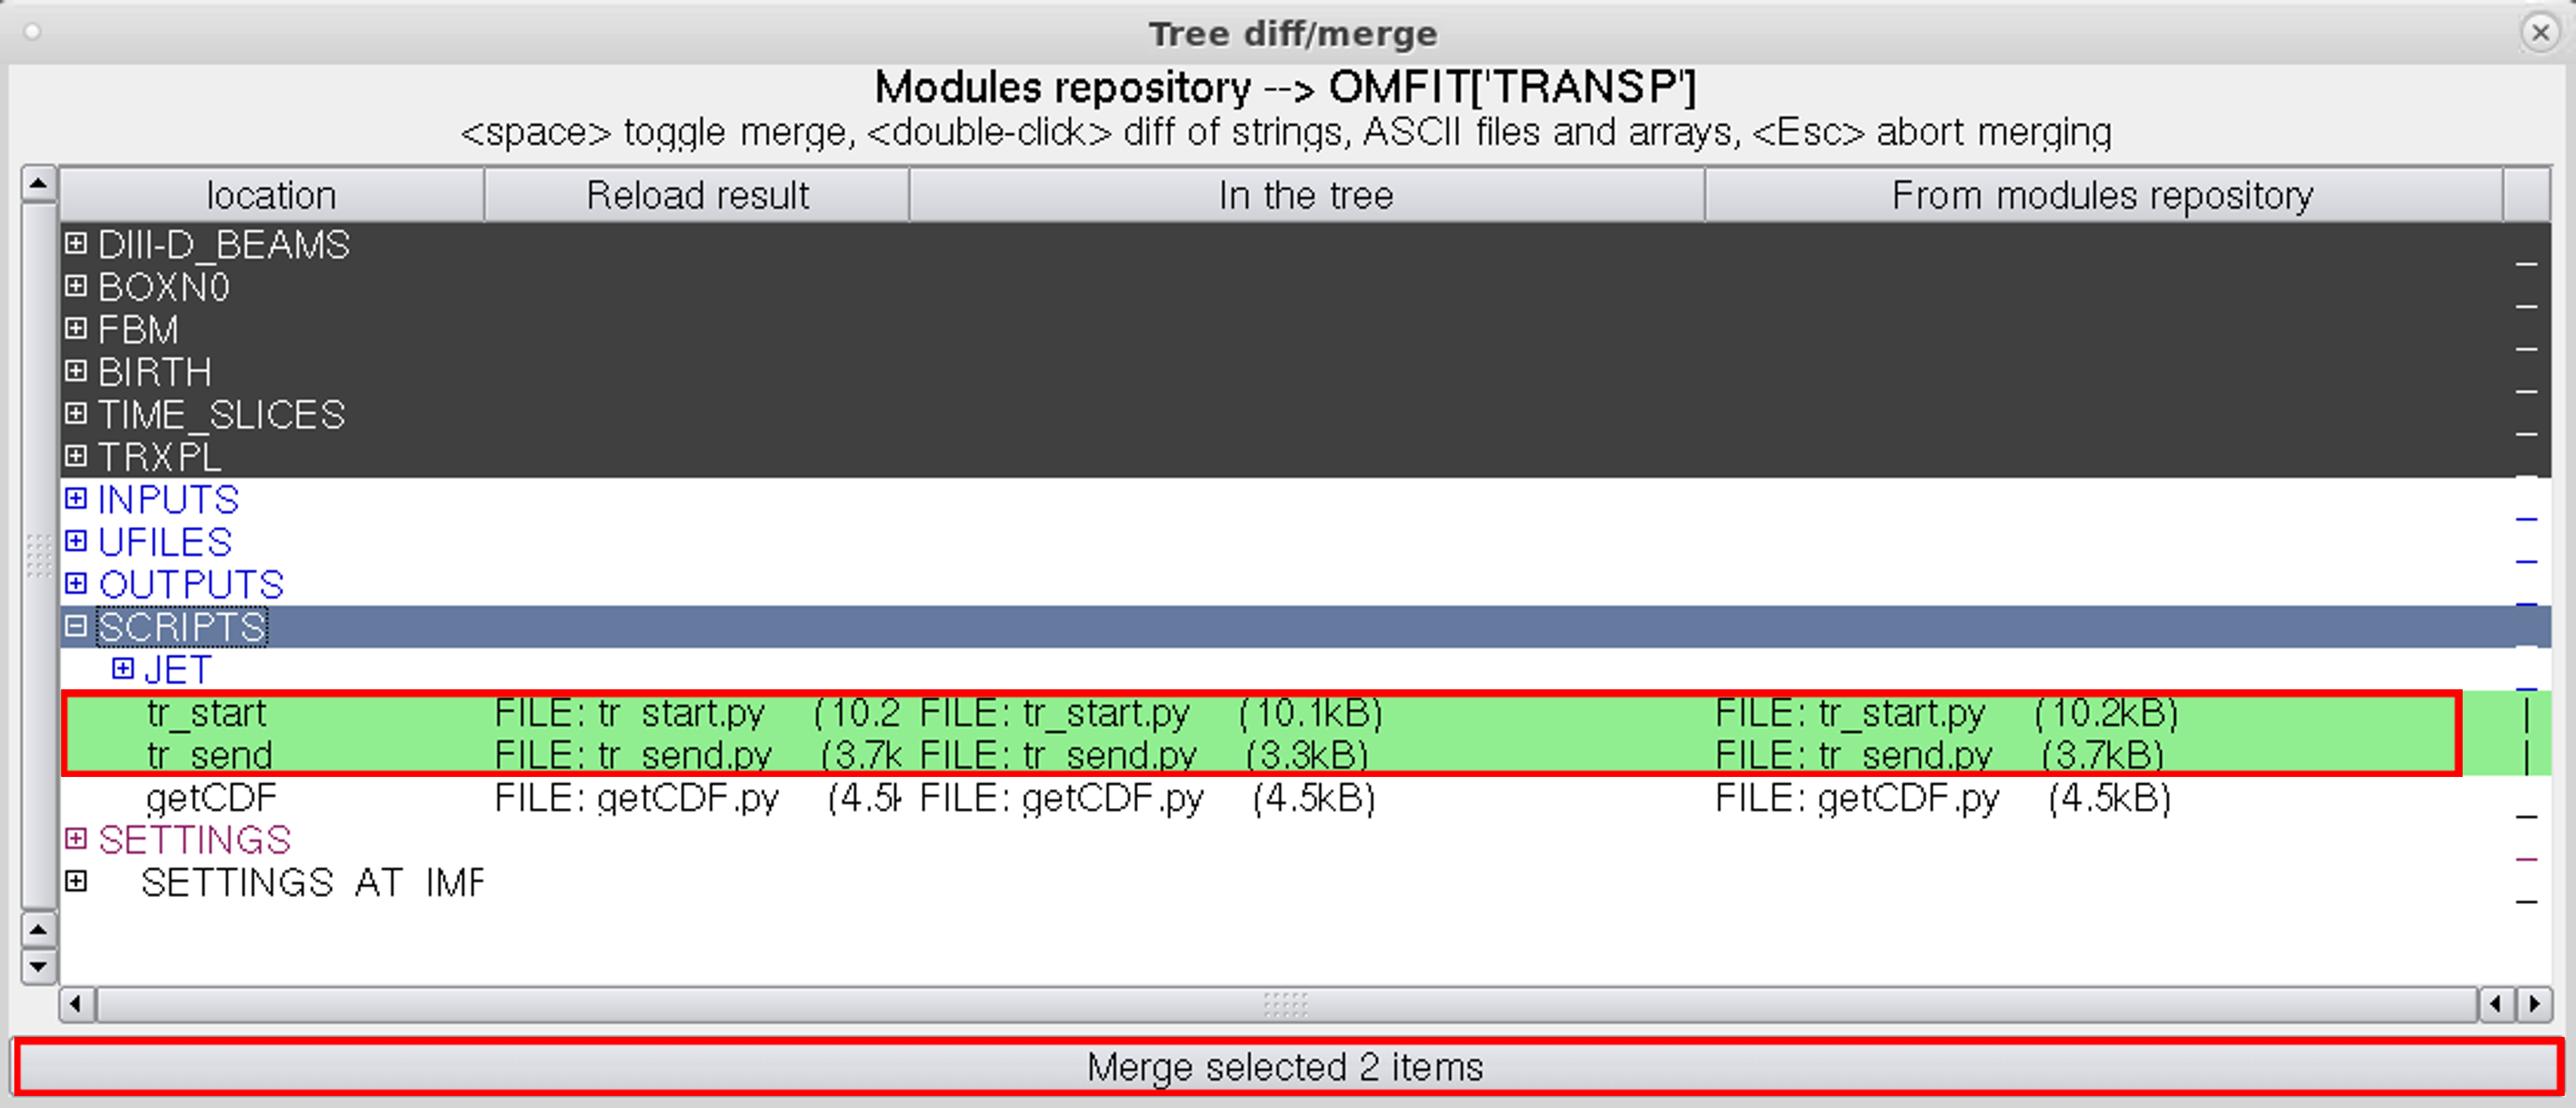
In the following pop-up window choose the scripts that you have made changes to by clicking on them and pressing the Spacebar key, which should highlight the field (double-click to
view the difference compared to the unstable branch), and then press the 'Merge selected items' button;
3.) Push the changes made to the OMFIT GitHub repository by opening a terminal and:
module purge
module load omfit # ensure you are using OMFIT's python3 environment
git status
git add modules # you can select which
git commit -m "Modules:TRANSP:comment on updates" # you can override the OMFIT python style check by adding -n
git push --set-upstream origin branchname
4.) Login to the OMFIT GitHub page and find your recent commit. Press the 'Open new pull request' button, fill in the description of the committed changes, and assign reviewers to the commit. Usually TRANSP related commits should be reviewed by Sterling Smith, Brian Grierson and fellow JET TRANSP ROs (and any other OMFIT developers that might be actively working on the same module). Then wait to receive comments from the reviewers, make corrections if needed and re-commit the new version of scripts. Once the review iteration is complete one of the core team developers will merge your changes into the unstable version of OMFIT, which will then be available for download.