Next (Data step)
Back (Dirs & Dbase steps)
Home
The config step primarily allows you to edit the namelist file being used for the run. Descriptions of most of the content of the namelist file is left to the
namelist section but here it is worth explaining the way that data from the PPF system is read into TRANSP. Towards the bottom of the namelist
file is a section beginning with $TRDATA and terminating with $END. This is referred to as the TRDAT namelist and is the part of the file
where the input data is specified. This section contains a set of pairs of lines the first of which begins with PRE and the second of which begins with EXT.
An example is shown below:
PREQPR='EFIT'
EXTQPR='Q'
The three letters following the PRE and EXT markers are a code (sometimes referred to as a trigraph) indicating a particular piece of diagnostic information.
In this case the code QPR indicates that these lines specify where to get the data for the input q profile. A list of common codes is given below,
the full list is here.
| QPR : | q Profile |
| CUR : | Plasma Current |
| DFL : | Diamagnetic Flux |
| VSL : | Surface Loop Voltage |
| TER : | Electron Temperature Profile |
| NER : | Electron Density Profile |
| MRY : | Fourier Moments of Plasma Boundary |
| RBZ : | Edge value of |
| BOL : | Bolometry data (can be 1D or 2D) |
| NTX : | Neutron Flux |
| NB2 : | Neutral Beam Power |
| ZEF : | 1D data |
| ZF2 : | 2D data |
| TI2 : | Ion Temperature Profile data |
| OMG : | Toroidal Rotation Frequency Profile data |
The right hand side of the PRE line indicates the DDA name of the PPF
this profile is to be taken from while the right hand side of the EXT line specifies the datatype name. By default the scripts will look for the sequence 0 PPF for this DDA name.
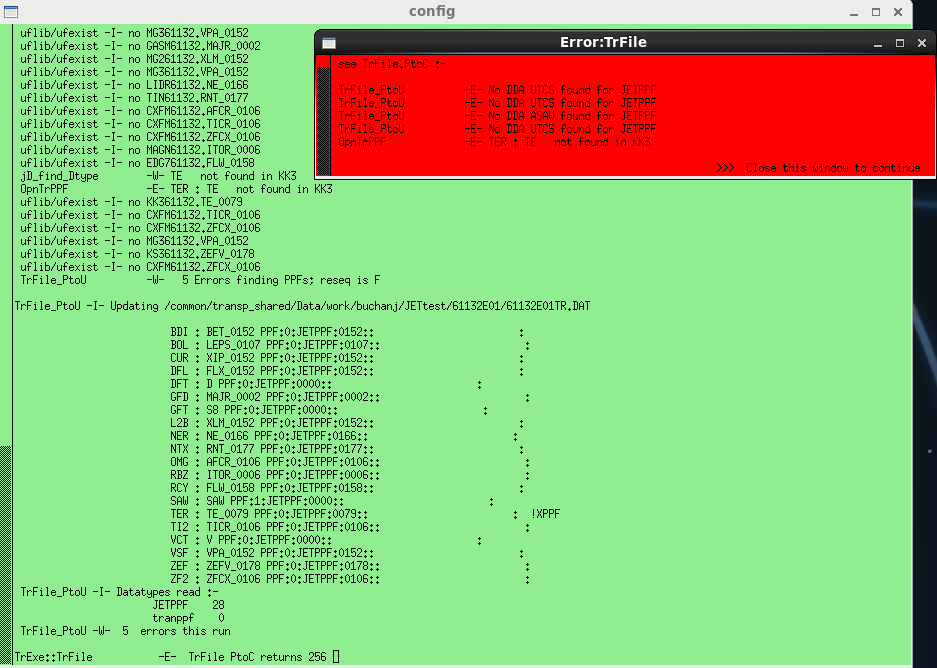
When the config step is run it will do an initial check of whether the specified PPF data exist and throw an error message similar to the one shown right if this is not the case.
If this happens you will need to modify the namelist entries for the PPFs specified in the error message. Note that without further information the system defaults to searching for a
public PPF, i.e. one with user name JETPPF. If you wish to use data stored in a private PPF, or data with an older sequence number, see this section.
For 2D profile data it is also necessary to specify the radial coordinate that has been used. This is done by setting a variable NRIxxx for each 2D profile where
xxx represents the trigraph corresponding to the dataset. So to set the radial coordinate used for the electron density profile data one would set the value of
NRINER. The various values that can be chosen and their meanings are listed in the following table.
NRIxxx=1: | Input data covers outboard major radius : R0 -> (R0+a) |
NRIxxx=2: | Input data covers inboard major radius : (R0-a) -> R0 |
NRIxxx=3: | Input data covers the entire midplane major radius : (R0-a) -> (R0+a) |
NRIxxx=4: | Input data covers the minor radius defined as the half width of a flux surface : 0 -> a |
NRIxxx=5: |
Input data is a function of |
NRIxxx=6: |
Input data is a function of |
NRIxxx=7: |
Input data is a function of |
NRIxxx=8: |
Input data is a function of |
The first four values can also be negated to indicate that the data is against the corresponding normalised coordinate, so setting NRINER=-1 would indicate that
the electron density data is against normalised outboard major radius (0-1). Negating the last four values has no effect as these variables are already
normalised, so -8 is the same as 8 for instance.
If 3 or -3 is chosen the namelist file must also indicate how to symmetrise the input data. This is
specified using variables named NSYxxx. The possible values for this are (taken from PPPL TRANSP website):
NSYxxx=1 : "onion skin" or "slice and stack" symmetrization algorithm : Let f(R) be the input profile and let h be a test value. If l is the length of the region
in the unsymmetrized data f(R) for which f(R) .ge. h, then define g(l/2) = h. The profile g(r) constructed in this manner is the symmetrized profile. Note that the output
profile g(r) is monotonically decreasing with r.
NSYxxx=2 : In/Out average. Use the TRANSP MHD geometry to determine the locations of the two intercepts of each flux surface with the midplane.
The simple average of the unsymmetrized data at these two points constitutes the symmetrized data value for the flux surface. Notes: the output profile is not necessarily monotonic,
the peak value may be reduced and the algorithm depends on accuracy of TRANSP MHD and boundary data.
NSYxxx=3 : R*dR weighted in/out average. Use the TRANSP MHD geometry to determine the locations of the two intercepts of each flux surface with the midplane.
The weighted average of the profile at the inner and outer flux surfaces is given by Navg = (Nin*Rin*dRin+Nout*Rout*dRout)/(Rin*dRin+Rout*dRout) where Rin,Rout are the major radii
and dRin,dRout are the flux surface spacings at the inner and outer intercepts. The same notes apply as for NSYxxx=2. This is approximately an area weighting.
NSYxxx=4 : R weighted in/out average. Use the TRANSP MHD geometry to determine the locations of the two intercepts of each flux surface with the midplane.
The weighted average of the profile at the inner and outer flux surfaces is given by Navg = (Nin*Rin+Nout*Rout)/(Rin+Rout) where Rin,Rout are the major radii at the inner and outer
flux surface midplane intercepts. The same notes apply as for NSYxxx=2. This option is mainly provided as a compatibility feature, since old versions of TRANSP applied
this weight when symmetrizing electron density (NER) data and other density profiles, under NSYxxx=2.
To execute the config step simply type:
JETtransp 'runID' step config
Whether the step throws an error as described above or not, the step will show a screen similar to the one shown to the right allowing the user to modify the namelist file. Selecting 'A' accepts the current namelist file and the step completes, selecting 'C' allows the user to modify a common subset of the namelist entries such as the starting and ending times of the simulation. Selecting 'E' will open the namelist file in a text editor allowing any entry to be modified. Selecting 'F' will allow editing of the TRDAT namelist section described above. Further options are then presented allowing the addition of new trigraph, deletion of an existing trigraph, listing of the current trigraphs etc.

One last thing worth noting here is that once the Data step has been run, the EXT lines will be appended with information describing which user ID and sequence number PPF the data for the given input was taken from. An example is shown here where the q profile was taken from a PPF owned by the user 'tranppf' with sequence number 0342:
PREQPR='EFIT'
EXTQPR='Q_0011 PPF:2:tranppf:0342:$SDD:Q_PROFILE(PSI_NORM) :'
If you use a template namelist from a different shot number this information is cleared when the run is started, however if you use a template from a run with same shot number it is left and the same sequence numbers will be used. This means that if the template run is old you may use out of date data. In this case it is good practice to delete this information leaving an entry like the first example for the q profile above so that the most recent sequence number is used.
Once an error-free namelist file has been accepted the config step is complete. The next step is the Data step.